Friday, June 28, 2013

CS Weekly Challenge Mini Album

#25
Challenge:   Mimi Album
June 25 - July 1, 2013

Hello Everyone.  Tammy here with another mini album to inspire you for this weeks challenge.  

I started this album for a close friends daughter that's getting married. I have watched quite a few YouTube videos trying to learn how to create mini albums.  I combined the idea the the mini envelope tutorial from Cassie Keith and the stacked hinge system from Follow the Paper Trail


Here's the front cover.  I don't want to over do the front.  I was working on some flowers for the front and my husband told me he liked it plain and to leave it alone. 

The base of this page is the envelope.  I have matted the front and added a pocket with a 1/2" gusset so more tags can be added.  It's hard to see by there's a card that has been matted in the pocket.  

The envelope was sealed and then had just a smidgen cut off the end creating a full size pocket and I've matted a card to create a photo mat. 


Here's the waterfall that's on the inside cover.  Each one of the mats can hold a 2 1/2" square picture and leaves the back for journalling. 


Here's a look at the binding.  The last page is hard to see but there's four of the 3-envelope page set ups.  

I can't wait to see all your great creations.  

Please make sure your blog posts has a link back to us.  

Thanks for participating in this weeks challenge.  Winners will be announced on July 5, 2013. 

Enter your submissions here

Wednesday, June 26, 2013

CBD - A Day with Daisies


Hello Everyone.  I hope all of you are enjoying your summer.  I haven't had a chance to get out much, but we leave for vacation shortly and I will get my fill of fun in the sun. 

Today Crafting by Designs has a great new challenge starting.  It's an ANYTHING GOES and it's sponsored by A Day with Daisies.


You really must go check out the store.  There are so many great images.  The lucky winner will receive 4 images of their choice.

I was lucky enough to be given the Miss Polly Clown to work with for this challenge.  Talk abut a fun image.  I must have colored six or seven of them playing with different color combinations. 

I was really stuck on her having red hair and I think it turned out more orange than red.  It's hard to see, but I used some orange stickles in a few spots in the flowers.


After all my fun coloring her with Copic markers, I couldn't decided what kind of sentiment she needed.  So while digging through my stash I found this stamp set called Attitude from Pink by Design.  I thought it fit perfect.


I then took a page from Kristina Werner's Online Card Classes and used my white gel pen and created a boarder around the card to help set it off.  I used is from the DCVW Fun in the Sun Matstack and A Muse Studio blueberry solid and polka-dot card stock.


Now's your chance to create anything and enter it in the weekly challenge.  Go Here to submit your entries.  You have until Tuesday, July 2nd to enter. 

Thanks for stopping by.
Tammy S.

Sunday, June 23, 2013

Summertime Blog Hop


Hello Everyone.  I'm so glad you decided to stop by today.  We have a great little hop going to celebrate Summer.  Our hop started with Suzanne and Zannieberry.

If you are in the middle of the hop you should have come from Diana 

We all created some great summer projects.  My project is an invitation that I sent out to all of our friends and inside is a list of road trips we had planned for the summer.  This gives everyone time to plan which rides fit with their schedules and make accommodations if they need.

I started with the Paper Smooches stamp set call Spiffy Scooter and use band my copics to color it orange.  Our Goldwing is Sunburst Orange.  He my husband calls it the scooter on occasion.  The second stamp set is the Road Trip Candies set.


I picked the Route 66 stamp because we are headed that way this summer.  I picked up the Detour stamp because there's always a detour in our travels.  

Thanks for stopping by today.  Your next stop is Cathie.  

If you get sidetracked along the way here's a complete blog line up.  

1.  Suzanne - zannieberry.blogspot.com


Please leave a comment to be in the Blog Candy Drawing on Friday, June 28, 2013.

Thanks for stopping by. 
Tammy


Thursday, June 20, 2013


Hello Everyone.  Today I have been given the honor of being Pimped out by Dezzy Does It.  

In my excitement, I decided that I wanted to use this opportunity to try something new.   I've been watching all of these wonderful videos on making mini albums and keep thinking "How hard can this be?" 

I really need to give credit to Angle Wings 14100 off of YouTube.  She created an awesome video with great instructions. You can access them here - Tutorial Video  

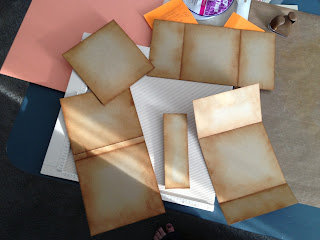
I made my share of mistakes, so give me a little leeway on the creation of my first mini.  I started with some Bazzill Kraft card stock and created my cover and all the pages. Then inked around the edges .
I used the He Said She Said Paper packet from Teresa Collins.  There was an additional elements package that contained mini file folders and I tried to make them fit in too. 


So here's the front cover of the album.  The diagonal card is in a pock and can be changed out.  The flower is hooked onto a magnet for the closure.   It's pretty plain but with some time to think about it, I'll probably keep adding to it. 
 So when you open the front cover.  There's a pocket on the first page with one of the file folder elements added as a tag.  The flap on the right side is also part of a file folder.

 Here's the flap opened up. 

 Here's the second pages of the album.  I left the big square to hold a nice size photo.  The tags on the right side are removable and can be used to mount pictures on the back or do some journalling.


Flip up the page on the right and here's another great spot for a large picture.  There's another large photo and Journalling spot on the tag that comes out of the pocket. The bottom section is a third page with a magnetic closure.


Here's how the page opens up.
 Once you fold the page down I used another file folder to create an added spot.  Then I used three celo bags that are 3" x 6" to create a section of clear picture or tag pockets. 


 Then there's another large spot for a picture  
I hope you enjoyed my first mini album.  It's was an interesting project and I've definitely learned that I need to take a little more time and make sure I have all  my folds right before I start gluing things down. 

Please stop by Deezy Does It to see this weeks sponsor and enter for your chance to win.

Until next time,
Happy Crafting
Tammy

Friday, June 7, 2013

C & S #22 - Graduation Friday

#22
Challenge:   Graduation
June 4 - 10, 2013

Hello Crafty Friends.  This is Tammy for a second day with another Graduation card.  

This one I created for my nephew Weston.  He graduated from Stansbury High and the logo for the school is a stallion coming through a horseshoe.  So I wanted the card to represent the the school. 

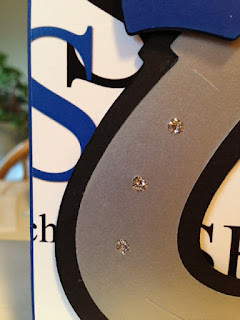
I started with a horseshoe and used silver stickles to fill the holes.  


I cut a hat and used CTMH Clear Glass to ad a little sparkle to the tassel.  I tilted it so that it looks like it's hanging off the horseshoe.  


Here's the whole card


Here's the inside.  The backside of the blue SHS paper is the black and white polk a dots.  


I had to put a few more cards together real quick for other graduates.  I like to make the cards match the school colors so that's why they are purple and blue.  


Thanks for stopping by today.  Be sure to enter your graduation creations to the challenge blog


Please make sure your blog posts has a link back to us.  

Thanks for participating in this weeks challenge.  Winners will be announced on June 21, 2013. 

Enter your submissions here

Thursday, June 6, 2013

C & S #22 - Graduation

#22
Challenge: Graduation
June 4 - 10, 2013

Hello Crafty Friends,

This week we are celebrating all those that are Graduating. So this week we are bringing you so great Graduation cards.

My card for today is for a young lady that is graduating from High School. Jacie was a Cheerleader during her years and I wanted to recognize that. So I started with a great digi cheerleader and used copic markers to color her red and black.

I wanted it to look like the Cheerleader had the graduation cap on, but I think I cut it to small.

I used CTMH Clear Glass to brighten the pom-poms and tassel.
Here's what I've done on the inside.
Now it's your turn to share your Graduation Creations.

Please make sure your blog posts has a link back to us.

Thanks for participating in this weeks challenge. Winners will be announced on June 21, 2013.

Enter your submissions here

Until next time, Keep Crafting

Tammy

Tuesday, June 4, 2013

CBD - Summer Fun Challenge


Hello Friends,  I'm here today with a cute little summer fun card.  I was given the oppertunity to use a digi stamp from this weeks sponsor. 


I used the Inner Tube Girl stamp.  


I colored the image using copic markers.  The waves stamp is from A Muse Studio, the sentiment if from Jaded Blossom.  I used Bermuda color card stock base, ink and buttons. 

Thanks so much for stopping by and checking out my card.  Be sure to head over to the Crafting By Designs Challenge and enter your summer time creation.  

Until Later
Tammy